My Blueprint for Developing an App from Scratch
TL;DR - Sharing my journey developing a native app end-to-end, with practical considerations along the way.
Few months ago, I realized that after spending years immersed in AI and Data Science, I had become too comfortable in that space - and uncomfortable with everything else. I could spin up PyTorch models and deploy them to production without a second thought, but terms like “backend,” “frontend,” and especially “app development” made me hesitate.
A fellow computer science enthusiast might say I had been DFS-ing (depth-first searching) my way through problems for too long, and it was time to BFS (breadth-first search) my way into something new. So I challenged myself: what if I built a real app, end-to-end, and put it into the hands of users?
The idea itself wasn’t groundbreaking - just an AI-driven solution that scratched a personal itch. But that wasn’t the point. This was about pushing myself beyond my comfort zone. So, along with a close friend who’s also a developer, we dove in. After our 9-to-5 jobs, we’d jump right into app building, piece by piece, late into the night.
The Idea: Scratching a Personal Itch
In an afternoon slump of scrolling social media, a small itch of mine resurfaced: I love saving recommendations from posts and articles for future reference. Whether it’s a travel itinerary, a new restaurant, or even a coffee shop, most of the places I visit come from something I saw online, usually shared by someone I follow. (I have been influenced 🤯)
But saving this content was always a hassle. I’d end up with a pile of saved posts on TikTok or a disorganized mess of Chrome bookmarks. Every time I wanted to find a good spot for lunch or plan an outing with friends, I had to sift through all of that - re-scanning TikTok videos or digging through bookmarks - just to find the one recommendation I had in mind.
If only (oh, the struggle) I could share whatever content I was looking at and have a tool automatically extract the relevant locations. It could save them in a designated place - on a map - so I could easily come back to them. And that’s how “Locator” was born. Whether it’s an amazing hiking trail, a taco shop, or a one-day Tokyo itinerary, you simply share it with the app, and it saves all the spots for you, neatly organized on a map.
Now, I’ll admit, this idea isn’t groundbreaking. Most of my friends didn’t even understand the need I was describing. But those who did? They loved it. Plus, research by eMarketer states:
Nearly 10% of Gen Z users now prefer TikTok over established search engines like Google when looking for information - suggesting it is gaining trust and usability as a reliable source of information.
From a marketing standpoint, basing an idea on personal desire isn’t exactly market research, but that wasn’t the goal of this journey. So, we went ahead with it anyway.
From AI to Full-Stack: A Learning Curve
As a data scientist, I’m comfortable with Python, but frontend development? That’s a different story. I had no clue how to publish an app, process payments, or even what React Native was. Starting this journey with such a knowledge gap was daunting. To make matters worse, every Google search presented a dizzying array of tools, each claiming to be the best fit for my needs.
From Vue to React Native for app development, Swift versus Kotlin for iOS and Android, and options like Supabase or Firebase for the backend - it felt overwhelming. Then there were the cloud services: AWS, GCP, Azure, Vercel. And let’s not forget payment processing with Stripe, LemonSqueezy, or RevenueCat. You get the point.
Amidst this chaos, I found that two critical components guide making the right decisions:
- Choose tools that build upon your existing knowledge. This ensures a smoother learning curve and faster progress.
- Opt for tools with a large community. A robust community means that most questions you have will likely already have answers, whether through online forums or your favorite language model.
In my case, I quickly gravitated toward frameworks that offered Python SDKs, like Firebase. That said, I realized something important: for first-timers, the specific tool you choose doesn’t matter as much as you might think. Instead of wasting time trying to find the “perfect” tool, just pick one that feels right and keep moving forward. The journey is more about learning and adapting than it is about having the absolute best tools from the start.
Designing the Blueprint: Planning the Architecture
This step is arguably the most important one you can take before writing a single line of code. Without a solid plan, you risk losing yourself in a sea of options, making it difficult to deliver on your original vision for the app.
At its core, our plan was straightforward, and approached from a top-down perspective: a user opens the app, begins with a secure login page, and, after verification, transitions to their saved places. The main interface features a database of saved locations displayed in a nested list format, where each URL maps to a corresponding list of extracted locations. A visually appealing “+” button invites users to enter new URLs for parsing by an AI model. An always-free tier allows users to submit a limited number of URLs each month while paying users enjoy unlimited access. Also, a feedback button should be added for users to provide input on their experience.
This design can be orchestrated with a minimal set of tools:
- Authentication Mechanism: For secure user login.
- NoSQL Database: A nested structure that stores URLs and locations (see below) with appropriate permission rules.
1
2
3
4
5
6
7
8
9
10
11
12
13
14
15
16
17
18
19
20
21
users
  └─ <user_id #1>
      ├─ feedback
      │   └─ <feedback_id #1>
      │       ├─ text: "Great app! Very useful."
      ├─ urls
      │   └─ <url_id #1>
      │   │    ├─ url: "https://example.com/1"
      │   │    └─ locations
      │   │        ├─ <location_id #1>
      │   │        │   ├─ name: "Location A"
      │   │        │   └─ geopoint: (latitude, longitude)
      │   │        └─ <location_id #2>
      │   │           ├─ name: "Location B"
      │   │            └─ geopoint: (latitude, longitude)
      │   │
      │   └─ <url_id #2>
               ...

  └─ <user_id #2>
      ...
- API Endpoints: A set of endpoints to handle read/write operations, model calls, and pricing plan state management.
- Cross-Platform Frontend: A simple interface with a small number of screens easily deployable to app stores.
With these specifications in place, we began selecting our tech stack.
 Our abstract design (made with draw.io), with (1) a login page that validates or sign-up a user, (2) a list that curates the user-saved locations, saved in the DB, (3) a submit screen to add a new link, (4) a processing step where an AI model extracts the locations from within the content in the URL, (5) the newly updated information is shown to the user, and (6) the user clicks on the locations and they display on a map
Breaking It Down: Frontend, Backend, and AI Integration
Let’s talk tools! In building Locator, we needed to carefully select the right technologies for each layer of the app: front for the user interface, back for handling data and logic, and AI for the magic behind extracting locations from content. Here’s how we broke it down:
Frontend
The frontend is the face of your app, and in the case of Locator, it needed to be clean, simple, and intuitive. We wanted users to easily navigate between their saved places, submit new URLs, and check their submission limits without friction.
For this, we chose React Native with Expo, a framework that allowed us to build a cross-platform mobile app with one codebase. Why React Native? Because it offers:
- Cross-Platform Flexibility: Write once, and deploy on both iOS and Android (This is 90% true, more on that later). This was key to reaching more users without duplicating our development efforts.
- Rapid Development with Expo: Expo simplified many of the challenges typically associated with mobile development. We could quickly prototype features and preview them on actual devices, reducing friction in the development process.
- Strong Community and Libraries: React Native comes with a rich ecosystem of components and libraries, making it easier to implement features like authentication screens, navigation, and state management.
We kept the frontend relatively simple, with a few core screens:
- Login/Signup: The entry point for users, built with Firebase Authentication for easy integration and secure access.
- Dashboard: A clean list of URLs and their associated geopoints. We designed this to be user-friendly, with a nested structure that organizes locations under each URL.
- Submit a URL: A straightforward input screen with a “+” button that prompts the user to submit a new URL to be parsed by our AI.
- Upgrade: A paywall, implemented with RevenueCat where users can pay a subscription or a one-time payment to enjoy unlimited URL submissions.
In terms of structure, we can observe the Frontend directory tree (ignoring installed libraries and Android builds):
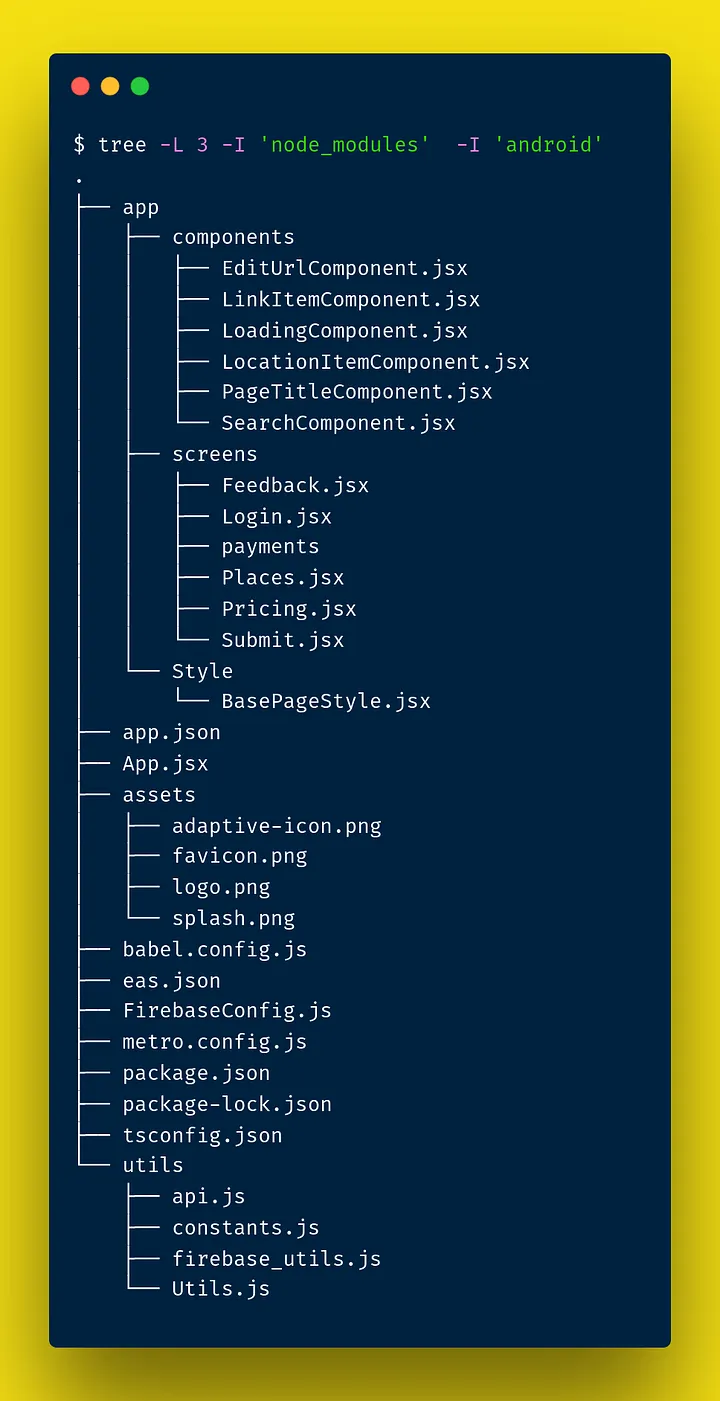 The tree structure of our app’s Frontend
We organized the app by separating key elements into specific directories for better maintainability. All reusable components, like titles, search bars, and buttons, were implemented in a dedicated components directory. The main app views-such as Feedback, Login, Payments, Places, Submit, and Pricing-were structured in a screens directory. These screens were orchestrated in the central App.jsx file, where we handled the menu setup and navigation logic. Additionally, we set up essential configurations for Firebase, EAS (Expo’s deployment tool), and utility functions in separate configuration files to streamline the app’s functionality and deployment process.
It is worth mentioning that most of the configuration tools are automatically generated when using the appropriate CLI tools. For example, eas.json is the result of eas build and app.jsx was generated when initializing expoCLI.
I must admit - the learning curve with these was quite steep, and it took me some time to make everything work together. Having said that, these tools are well-known and highly documented (remember my point from earlier!), and I’ve added some relevant links to get started below.
Backend
The backend is the backbone of Locator, responsible for data management, user authentication, and interaction with our AI model. We chose Firebase as our backend solution for its powerful features and ease of integration. Here’s how we structured the backend:
Firebase Architecture Overview: Our Firebase setup consists of several critical components, organized in a structured directory to maintain clarity (ignoring cache files and virtual environments):
 The tree structure of our app’s Backend
- Data Storage: For our primary database, we used the simple NoSQL Cloud Firestore, which allows us to store user data, saved URLs, and extracted locations in a flexible, nested structure. This structure enables efficient data retrieval and management. It is the DB that most of our endpoints interact with, whether if its reading user information, or writing new data written by the user.
Cloud Functions: Our server-side logic is handled through Firebase Cloud Functions, defined in the
functionsdirectory. Themain.pyfile contains all our API endpoints, which facilitate various functionalities, including:- Adding a URL that triggers the AI model for location extraction.
- Submitting user feedback.
- Retrieving user data.
- Validating user payment subscriptions.
- Verifying ID tokens to ensure secure access.
We also implement simple cron jobs, that re-initialize user payment-related fields each month.
- Machine Learning Integration: Inside the
mldirectory, we developed scripts likener.pyfor named entity recognition andevaluators.pyfor model evaluation, ensuring our AI capabilities were robust. Theprompt.txtfile includes predefined prompts to guide the AI’s processing of user-submitted URLs. (More on this later!)
Similarly to the front, some configuration files were instantiated when working with CLI tools like Firebase’s. For example - when initializing a Firebase project with firebase init, a firebase.json configuration file is created, in which relevant ports for local testing are defined, as well as Firestore rules and function source path.
A Word on Firebase: For those who may be less familiar, using a Backend as a Service (BaaS) has become quite common when developing applications. Firebase, developed by Google, is one such tool that consolidates multiple backend functionalities into a single platform. It serves as a comprehensive solution for database management, user authentication, endpoint creation, and even hosting, along with a suite of AI tools.
While Firebase is a powerful choice, it’s not the only option available. Supabase is a popular BaaS that positions itself as an open-source alternative to Firebase, offering flexibility without vendor lock-in.
I won’t tire you with the specifics of each platform, but I can confidently say that utilizing a service like Firebase or Supabase can save you a significant amount of development time - just as it did for us. Typically, the free tier is quite generous, allowing you to get started without incurring costs. In our case, we only pay a few cents for CPU seconds, while many other resources are provided at no charge.
A real example
For brevity, I won’t show/explain our entire backend code, but I will focus on one example of an endpoint, that contains much of the logic we use - adding user feedback:
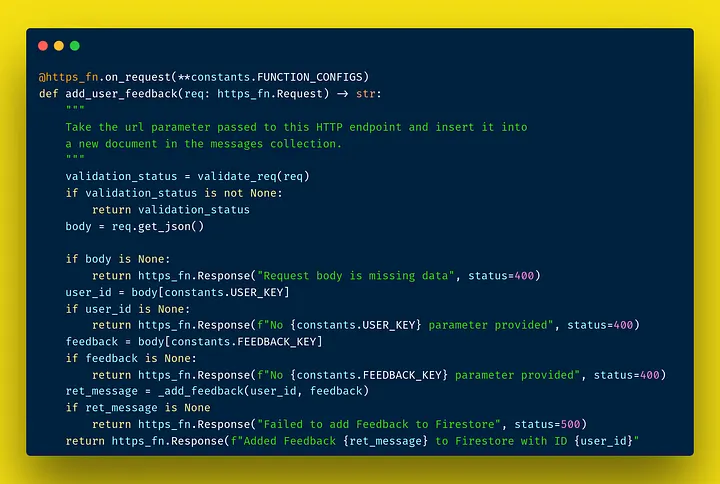 the
the add_user_feedback endpoint checks that the user is validated, and that the request body is structured as it should. It then calls the underlying _add_feedback that implements the core logic.
Some key points to consider about the endpoint:
- the
FUNCTION_CONFIGSis a dictionary that determines configurations on the endpoint, like memory, CPU, timeout, region, etc… validate_reqis responsible for fetching the Authorization info provided in the request, and verify it with a firebase auth function
when everything is “OK”, the _add_feedback function is called:
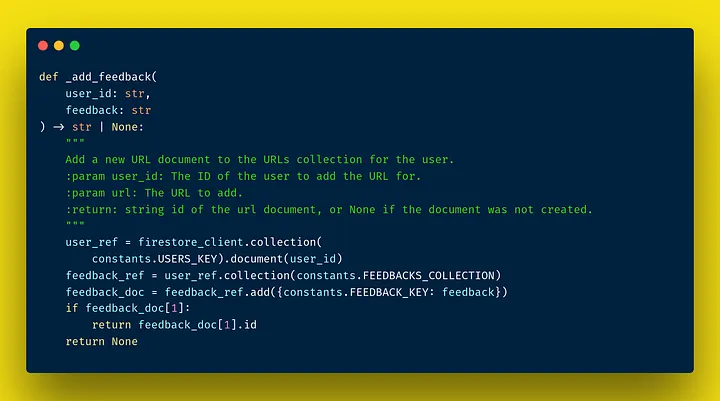 the underlying
 _add_feedback function, that adds a user feedback to Firestore
_add_feedback fetches a reference to the user from Firestore, and then adds the feedback to the feedback reference associated with the user. Most of our functions are implemented just like that.
Machine Learning Modeling
Nested in the backend is our location-extraction model approach. Initially, we explored Named Entity Recognition (NER) models available on platforms like Hugging Face, specifically considering options such as bert-base-ner and bert-large-ner. The idea was to leverage these models for free and capitalize on existing capabilities. However, we quickly realized that while these models are powerful, they often require significant customization and fine-tuning to perform optimally for our specific use case. This led us to shift our focus toward using Langchain and OpenAI to build a tailored NER solution that directly extracts location-based entities from user-generated content.
We structured our model with the following components:
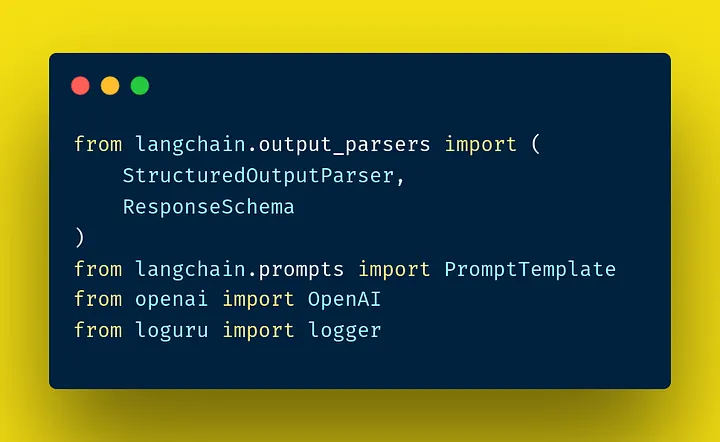 main imports that we used to build our model - langchain, openai and loguru for logging.
The core of our model is built around a clearly defined INSTRUCTION_PROMPT, which guides the extraction process. This prompt is designed to capture meaningful location information, ensuring that we obtain valuable recommendations such as restaurant names, shops, and landmarks while filtering out irrelevant data.
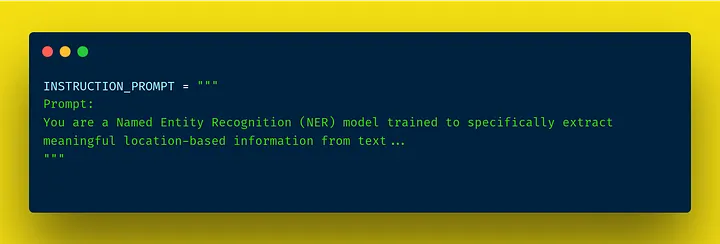 the prompt we provided to our model
One key feature of our prompt design is the incorporation of few-shot learning. By providing examples of the types of locations we want to extract, we can significantly enhance the model’s understanding of the task. This approach allows the model to learn from just a few annotated instances, making it more adaptable and accurate in identifying relevant entities in various contexts. It enables us to guide the model effectively, ensuring it focuses on what matters most to users while minimizing irrelevant output.
Through our pipeline, we combine user input with the prompt, run it through OpenAI’s 4o-mini model, and parse the output to retrieve relevant locations.
Additionally, we paid careful attention to the trim size of the text inputs to ensure the model could effectively handle varying lengths of user-generated content. We scraped 20–30 sources from platforms like Instagram and various web blogs to analyze how our model managed context length. This evaluation revealed that longer texts could dilute the relevance of extracted entities, leading to less accurate results. Based on our findings, we decided to trim the text inputs to an optimal length that preserved context while ensuring clarity, focusing on the average size of the content we encountered.
Ultimately, this experience taught us an invaluable lesson: while it’s tempting to utilize off-the-shelf models that seem promising, it’s crucial to prioritize solutions that effectively meet your product’s needs first. After validating the product and understanding user requirements, then it makes sense to explore alternative models for potential improvements.
 A simplified mermaid graph, explaining the connection between the tools used in our app
From Prototype to Polished: Building and Iterating
The journey of developing Locator has been a dynamic and sometimes chaotic adventure. After learning the tools we needed, it was a different task to make them run. We found ourselves starting with the Frontend, so things got visual rather quickly. Installing Expo means you can run a npx expo run command and start building right away. Whether it was Expo’s app, Expo Go, or the development build, we could render the Frontend on our phones or in Android Studio. This setup was a huge advantage; it meant we could see the app in action immediately, allowing us to spot issues and make tweaks on the fly.
During this phase, we also ran the Firebase Emulator with firebase emulators:start in a separate terminal. This was crucial because it allowed our Frontend to interact with a fully simulated backend. The emulator is extensive-it mimics a full production environment, complete with user email verification, database rules, and all our API endpoints. We could test everything as if it were live, which helped us iron out potential problems before they became bigger headaches.
Deploying the backend was another critical step; we used firebase deploy, and for quicker function updates, the --only functions flag allowed us to streamline our process without redeploying the entire backend each time.
Once we felt satisfied with our version, we turned to EAS for our production build. The command eas build --profile production became our go-to for prepping the app for the Google Play Store. After a successful build, we uploaded it for approval. bundletool was used to convert Android versions like .aab to .apk for local testing, which helped ensure everything was working smoothly before the official rollout.
The process was long and tedious. Each branch opened up dozens of new questions: How do we add informative logs to the Frontend? How do we convert AAB to APK using EAS secrets? What’s the best way to store API keys securely? How can we scrape content without getting hit with 403 blocks? How do we verify that a user is authenticated? And how do we block access for users on the free tier? Each challenge required thoughtful consideration and careful planning, but a strong local development process made our lives easier.
Anyway, once a version we were satisfied with was ready - it was time for publication.
The Google Play Store submission was a journey in itself. We had to run various tests and gather feedback from friends and family, needing at least 20 friends to opt in over 14 days. Coordinating this was no small feat, but their insights were invaluable. We configured products in the app that are both subscription-based and one-time payment-based. Those were then important to RevenueCat, which connected the dots between the code and the actual product.
After collecting much-appreciated feedback from our testers, we’d dive back into development builds and local testing. Each round of iteration felt like a mini-project within the larger journey, and we learned so much about what the app was missing from the feedback. The process wasn’t just about building an app; it was about refining our vision based on real user experiences, which ultimately made Locator stronger and more user-friendly.
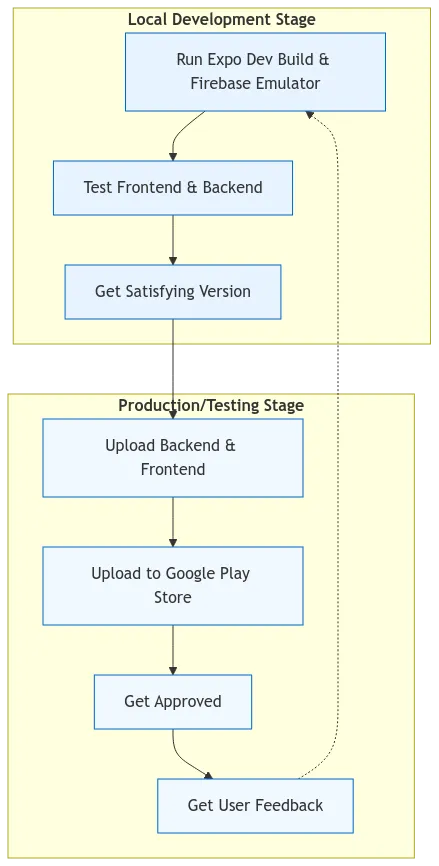 our development cycle
The Final Push: Preparing for Launch
We tested the Frontend with live data to ensure everything functioned smoothly while ramping up the backend to reflect a production-like environment. Once we were confident in the app’s performance, we focused on finalizing a satisfying version for release. We also tested the purchases and payments logic and validated end cases for user behavior.
While we weren’t (and still aren’t) extremely satisfied with the frontend, we can safely say that the app does what it was intended to do: users can share URLs and have locations scraped automatically. We chose to push towards publication rather than continue working on a minimally validated product. After all, there’s a common saying: “If you love the way your app looks when deployed, you’ve probably waited too long.”
The deployment process was critical. We used firebase deploy to upload our backend and eas build to upload the frontend, preparing everything for the Google Play Store. After submitting the app, we waited for approval. Once we received the green light, we launched silently, without doing any marketing aside from a small tweet on X and sharing the link with friends. We just wanted our app to be publicly available for everyone to download, not expecting it to reach many users. After the launch, we shifted our focus to gathering user feedback, which would be essential for our next iteration. This phase was not just about launching Locator; it was about setting the stage for ongoing improvement and user satisfaction as we prepared to share our creation with the world.
Lessons Learned: What I’d Do Differently Next Time
Reflecting on our journey with Locator, there are several key insights I’ve gained that would shape my approach for future projects:
- Focus on Web First: In hindsight, starting with a web application would have been a smarter move. Web apps are easier to deploy and don’t depend on approval from gatekeepers like Google or Apple. This approach allows for faster iteration and immediate access to users, which is crucial in the early stages of product development.
- Take Feedback with a Grain of Salt: While feedback is invaluable, it’s important to remember that not all feedback is equal. We learned to be more discerning about whose opinions we prioritized, especially when it came from individuals who weren’t our intended clientele. It’s easy to get swayed by every suggestion, but staying true to your core vision is equally important.
- Seek Feedback from Direct Consumers: If I could do it again, I’d put more effort into reaching out to our target audience for feedback. Friends and family are great for initial testing, but they come with inherent biases. Getting insights from potential real users would have given us a clearer picture of what features truly mattered.
- Question Every ‘Cool’ Feature: We often found ourselves excited about adding new, flashy features to Locator. However, this sometimes distracted us from our core mission. Moving forward, I’d be more critical about each addition, always asking: “Does this feature directly contribute to solving our main problem?” This approach would help maintain focus and prevent feature bloat.
- Balance Development with Marketing: As developers, we naturally gravitated towards coding, spending about 90% of our time on development and only 10% on marketing. In retrospect, this ratio should have been reversed. Great products don’t sell themselves, and I’ve learned that marketing is just as crucial as development, if not more so.
- Document Everything: As we rushed to build and launch, our documentation often lagged. This made it challenging to even recall our own decision-making processes. Going forward, I’d prioritize documentation as part of the development process, not as an afterthought.
By keeping these lessons in mind, I believe our next steps with Locator and our future projects will not only be more efficient in development but also more effective in reaching and satisfying users.
Looking Forward: What’s Next for Locator
In one word - marketing.
With the app now available to the public, our next focus is on expanding our reach and growing our user base. We understand that simply launching Locator is just the beginning; we need to actively promote it to connect with users who would benefit from its features. This means exploring various marketing strategies, such as launching on platforms like Product Hunt to generate buzz and engage with a community of early adopters.
Additionally, we plan to work with small to medium-sized influencers in our niche to get more eyes on the product. By collaborating with these influencers, we can tap into their audiences and demonstrate the unique value Locator offers. Submitting to relevant subreddits will also be part of our approach, allowing us to reach interested users and gather feedback.
As two devs, this step may be the most difficult one, but we’re motivated and believe we’ll get to speed quickly!
Support us
Locator is available for Android/[iOS](https://apps.apple.com/il/app/locatorai/id6740416327
Relevant Resources
Throughout the process, we’ve gathered MANY links, docs, articles, and best practices. here are some of them:
Backend
- Firebase docs
- Google’s Cloud Run (where your Firebase functions live)
- Cloud run’s user authentication
- web scraping marketplace: https://apify.com/
- youtube cli tool: https://github.com/ytdl-org/youtube-dl
- aab to apk conversion cli-tool
- token classification with huggingface
Frontend
- react-native getting started
- react-native directory: find which packages work on which platform
- beautiful UI/UX tool: https://nextui.org/
- react-native & expo youtube tutorial (Note: This might be a Rickroll, replace with a real tutorial if needed)
- expo share intent repo
Payments
- RevenueCat docs
- Integrating expo with RevenueCat blog post
- stripe replacement (web only): https://www.lemonsqueezy.com/
Mocks
- Mockup tools for App stores https://previewed.app/
- Maneken (pretty but limited for free users): https://maneken.app/
- Canva: https://www.canva.com/, has a new mockup feature